
|
by Carlo Scodanibbio |
|
| home | course program | course leader | enquiries | enrol | testimonials | download |
|
Lessons
welcome1 - chapter a 1 - chapter b 1 - chapter c 1 - chapter d 1 - chapter e 1 - chapter f 1 - chapter g 1 - chapter h 1 - chapter i 1 - chapter j 1 - chapter k 2 - chapter a 2 - chapter b 2 - chapter c 2 - chapter d 2 - chapter e 2 - chapter f 2 - chapter g 2 - chapter h 3 - chapter a 3 - chapter b 3 - chapter c 3 - chapter d 3 - chapter e 3 - chapter f 3 - chapter g 3 - chapter h 4 - chapter a 4 - chapter b 4 - chapter c 4 - chapter d 4 - chapter e 4 - chapter f 4 - chapter g 4 - chapter h 4 - chapter i 4 - chapter j 4 - chapter k 5 - chapter a 5 - chapter b 5 - chapter c 5 - chapter d 5 - chapter e 5 - chapter f 5 - chapter g 6 - chapter a |
the background attribute
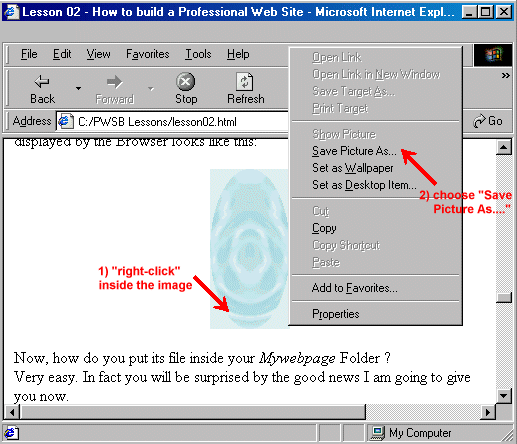
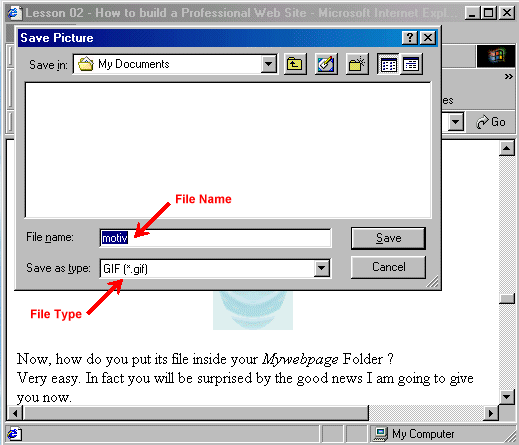
Well, well, I know you like these fancy things, because you have seen many beautiful Pages on the Net made this way. No problem. What you need in this case is to insert a different ATTRIBUTE in the BODY TAG, which is BACKGROUND (instead of BGCOLOR). Then you also need a Picture to be "laid down" or "tiled" in the BODY of the Page. This Picture must be in .GIF or .JPG format. So far I have told you nothing about Images and Graphic Files, which I will do in a future Lesson, so you will just have to believe me in what I am saying. This picture.gif or picture.jpg file can be obtained in various ways, but must in any case be saved in the same folder as your HTML Document (in our case, in the Mywebpage folder). The BODY TAG will look as follows: <BODY BACKGROUND="picture.gif"> This is my first Web Page !!! </BODY> So, what you need is a graphic file. I have one ready for you, that is called motiv.gif. I have made it and when displayed by the Browser looks like this:  Now, how do you put its file inside your Mywebpage Folder ? Very easy. In fact you will be surprised by the good news I am going to give you now. Just follow these basic steps: Right click on the displayed Image. A pop-up menu will appear. Choose (click on) "Save Picture As...". Like this:  The usual Save As Dialog Box will appear, like this:  You may note:
|
|
previous |
shut-down this HTML story ! |
|